
| Return to Index. | Next - Customising units. |
In previous chapters you were shown how to add items using the Unit Toolbars, and to select items by left-clicking on them whilst in "Drag and Drop" mode. Described below are alternate methods for adding and selecting items. These should be considered as advanced methods, and you should be familiar with the methods described in previous chapters.
The methods covered below work in all room systems.
In Adding Your Units you were shown how to create items using the Unit Toolbars. There is a second method for adding items where you type in a code into the Select Box at the top of the design screen. With practice many users find this method quicker, especially for drawing the Walls layer of your design.
NOTE - you should be familiar with using the Unit Toolbars before attempting to use the code method.
Codes are entered into the Select Box at the top of the design screen.
The Select Box is to the left of the Select... Button. Type the code into the box and press "Return" or "Enter" on your keyboard to create the item.
Before entering a code the Select Box must be empty i.e. you cannot have an item selected.
Codes can be entered in upper or lower case.
ArtiCAD will not accept an invalid code. You will be unable to add any other items until the incorrect code is removed from the Select Box.
Every item in ArtiCAD has a code. There are two ways of finding the code.
It is also possible to specify the width of the item using the code. In the Walls layer, "A" is the code for an archway. Entering "A" on it's own will create an arch using the default width (1000). "1200A" will create and arch 1200 wide. "950D" will create a 950 wide door.
Within each layer there is a default item - an item that does not need a code, you only need enter a size.
In the Walls layer, entering "1000" will create a 1000 wide wall. In Kitchen Base Units, entering "600" will create a 600 wide regular base cabinet.
| Room System | Layer | Default Item |
|---|---|---|
| Kitchen | Walls | Wall |
| Base Units | Ordinary base unit | |
| Wall Units | Ordinary wall unit | |
| Bathroom | Walls | Wall |
| Base Units | Space | |
| Wall Units | Wall unit | |
| Bedroom & Studies | Walls | Wall |
| Base Units | Space | |
| Wall Units | Space |
Return to top.
In Drag and Drop you were shown how to select items using the mouse. There are a few situations where it is not possible to use the mouse to select items.
You can use the keyboard to select items. Pressing the left-arrow (usually to the bottom-right of your keyboard) will select the item added before the currently selected item. Pressing the right-arrow selects the item added after.
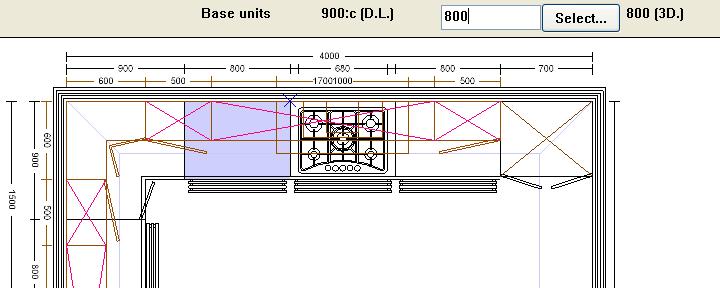
In the above image, pushing the left-arrow would select the L-shaped corner base, pushing the right arrow would select the 800 wide drawer pack.
IMPORTANT - items are listed in the order they were added to the design, not the order they appear on the design.
You can change the layer you are in by pushing the up-arrow or down-arrow keys. For example, if you were in the Base Units layer, pushing the up-arrow would change to the Walls layer, pushing the down-arrow would change to the Wall Units layer.
Return to top.
| Key | Action |
|---|---|
| Up arrow | Move to the layer above this one i.e. if you were in the "Wall Units" layer, move to the "Base Units" layer. |
| Down arrow | Move to the layer below this one i.e. if you were in the "Walls" layer, move to the "Base Units" layer. |
| Left arrow | Select the item to the left of the Select Box i.e. the item added previous to the currently selected item. |
| Right arrow | Select the item to the right of the Select Box i.e. the item added after the currently selected item. |
| Home | Select the first item in the current layer. |
| End | Select the last item in the current layer. |
| F1 | Edit the selected item. |
| Delete / Del | Delete the selected item. |
Return to top.